![]()
![]()
|
|
|
|
In this section |
See also Wiring DSP devices together using flyoffs Routing audio to and from NioNode audio cards Routing audio on Dante networks |
In order to route audio between a NioNode and other devices via a CobraNet network, you must select a CobraNet option in the Audio Network Configuration list on the NioNode properties. This adds a CM-1 folder under the NioNode on the Flyoffs tab, and a CM-1 tab to the NioNode block.
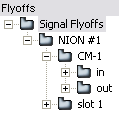
You can wire devices to the CM-1 flyoffs so that audio can flow from devices on the CobraNet network to devices in your design, or vice versa.
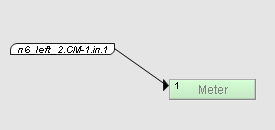
In the example below, signals flow from the Mixer device on one NioNode called n6 left 3, out to the network, then back in from the network to a NioNode called n6 left 2, and finally on to a Meter device.
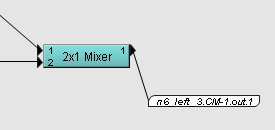
Firstly, you wire the audio output from a device to the input connector on one of the CM-1 output flyoffs, as shown below.
Wiring to the CM-1 output flyoff indicates that the audio data will be transferred to the CM-1 interface on the NioNode n6 left 3 and then on to the network where it can be received by another device.
In another part of the design, a CM-1 input flyoff for the n6 left 2 NioNode is wired to a device to indicate that audio data will be received from the network and transferred to the device.
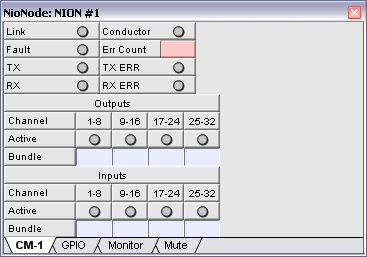
The CM-1 interface supports a maximum of 32 input sub-channels and 32 output sub-channels. In the screenshots above, the example uses output channel 1 on the first NioNode and input channel 1 on the second NioNode.
In order for audio to flow between the 2x1 Mixer device and the Meter device, you need to specify settings on the CM-1 tab on both the transmitting NioNode and the receiving NioNode. Settings on the tab control how the sub-channels are organized into bundles for transmitting and receiving data. You can choose whether to arrange the sub-channels into 4 eight channel bundles or 8 four channel bundles, or you can choose the Advanced option, which allows you to choose how many channels each bundle will contain.
When you use the 4x8 or 8x4 options, data is sent using unicast, so the option you choose determines how many devices can receive the audio data in the bundles. If there are five different audio channels that are to be sent to five different receiving devices, for example, you will need to use the 8x4 option or the Advanced option. The 8x4 option allows you to specify up to eight receivers; the Advanced option, up to 16.
Tip: If the CM-1 tab is not displayed on a NioNode device, it is because the Audio Network Configuration setting on the device properties is set to None. It needs to be changed to one of the other values, which are explained below.
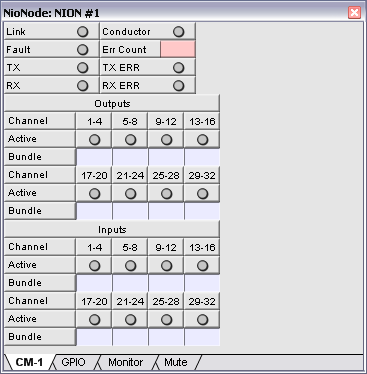
When the CobraNet CM:1 4 8 Channel Bundles option is selected, the CM-1 tab looks like this:
The CM-1 sub-channels are organized into bundles, with up to eight allowed in each. The bundles are identified by bundle numbers, which are typed into the Bundle boxes. The Active LED above each bundle box will light green when the bundle is actually being transmitted or received.
When the CobraNet CM:1 8 4 Channel Bundles option is selected, the CM-1 tab looks like this:
The CM-1 sub-channels are organized into a larger number of bundles, each containing four sub-channels.
When the CobraNet CM:1 Advanced option is selected, the CM-1 tab looks like this:
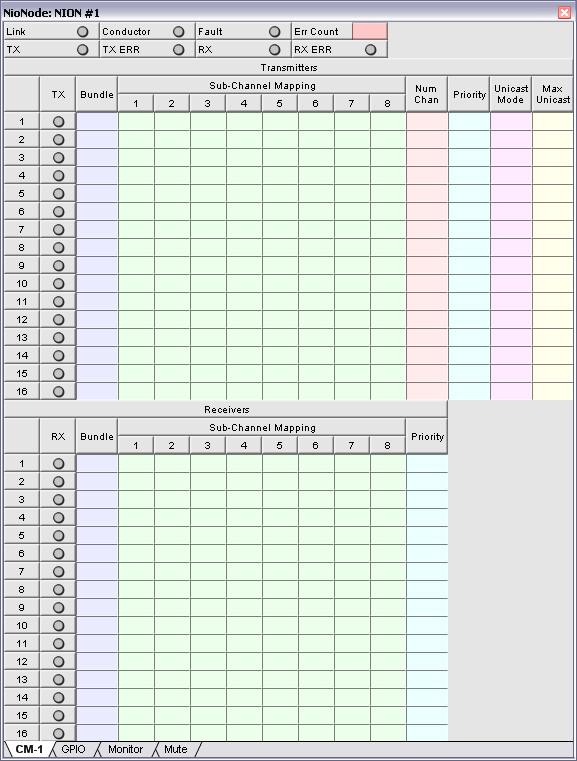
Tip: This layout is also used on CAB and nControl devices.
The display is arranged in a 2-D grid with the transmitters and receivers for the CM-1 interface shown as rows and the sub-channel positions shown as columns. The bundles do not have a set number of CobraNet sub-channels, just a maximum of eight. You can specify exactly which sub-channels to put into each bundle and arrange them into the eight available positions. In the example below, transmission bundle number 1000 contains three sub-channels; the remaining five sub-channels are unused.
![]()
As there are unused sub-channels in the bundle, the Num Chan setting has been set to 3 to indicate that only the first three sub-channel mapping columns are in use, and columns 4-8 can be ignored. The Num Chan setting, which has a default of 8, controls how many audio channels are sent in a bundle. The value should be set to the number of contiguous channels that will be used, as defined in the Sub-channel Mapping boxes. If Num Chan is set to a value that is greater than the number of channels used, then the bundle will be larger than necessary and will result in wasted bandwidth and processor time. Unused channels with a value of 0 are represented in the bundle by header data only (and no audio data will be included). If the bundle contains subchannel numbers that are not used, they will be sent as full audio channels and consume 1 Mbit of bandwidth per channel.
The TX or RX LED next to each bundle assignment will light green when the bundle is actually being transmitted or received.
Each transmitter bundle can optionally have a priority associated with it. This is used in certain redundancy scenarios and allows one machine to backup another. If one of the machines should fail, the other takes over automatically. When there is more than one transmitter on the network with the same bundle assignment, the transmitter with higher priority is used.
Transmitters can send data onto the network using unicast, multi-unicast or multicast. The Unicast Mode field controls this. Values for this field are Always (always use unicast), and 1-4 (1 meaning there is only one receiver - so use unicast, 2-4 meaning there are multiple receivers, so use multi-unicast).
Multi-unicast is provided because multicast is disruptive to most networks. In the multi-unicast scenario, if the transmitter has multiple receivers it will send each a unicast version of the packet unless the number of receivers is higher than the Max Unicast value specified for the transmitter. If that value is exceeded, it will revert to multicast. Multicast can also be specifically requested by using a bundle number in the range 1-255.
Each receiver can also have a priority, but its use is slightly different from the transmitter side. On the receiver side, this priority is used to determine which receivers will be serviced in the event there are not enough resources to fulfill all receiver requests. In this scenario, receivers with higher priorities will be serviced first.