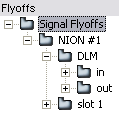
In order to route audio between a NioNode and other devices via a Dante network, you must select the Dante DLM option in the Audio Network Configuration list on the NioNode properties. This adds a DLM folder under the NioNode on the Flyoffs tab.

You can wire devices to the DLM flyoffs so that audio can flow from devices on the Dante network to devices in your design, or vice versa. Once you have wired up the devices in the NWare project, you will need to complete the set up process using Dante Controller.
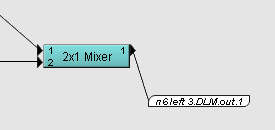
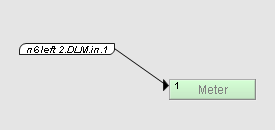
In the example below, signals flow from the Mixer device on one NioNode called n6 left 3, out to the network, then back in from the network to a NioNode called n6 left 2, and finally on to a Meter device.


Firstly, you wire the audio output from a device to the input connector on one of the DLM output flyoffs, as shown below.

Wiring to the DLM output flyoff indicates that the audio data will be transferred to the DLM interface on the NioNode n6 left 3 and then on to the network where it can be received by another device.
In another part of the design, a DLM input flyoff for the n6 left 2 NioNode is wired to a device to indicate that audio data will be received from the network and transferred to the device.

The DLM interface supports a maximum of 32 input sub-channels and 32 output sub-channels. In the screenshots above, the example uses output channel 1 on the first NioNode and input channel 1 on the second NioNode.
Once the wiring is complete in NWare, open the Dante Controller program and create audio connections between Dante transmitters and receivers with the same numbers as the DLM flyoffs you used in your NWare design. These will be listed under the NioNodes you are using (n6left 2 and n6left 3 in the example). This completes the procedure.
Note: Configuration of Dante audio network connections is only supported through 3rd party applications, such as Audinate's Dante Controller software. This software supports 32 channels of 48k audio in and out.
For more information on using the Dante Controller, refer to the Audinate documentation and the Audinate website. For a simple worked example in this manual, see Worked example.
|
In this section |
See also Wiring DSP devices together using flyoffs Routing audio to and from NioNode audio cards Routing audio on CobraNet networks |