![]()
![]()
|
|
|
In the NWare installation folder, there is a program called ndp.exe. It can be used to list devices on the network and assign them IP addresses. NDP uses Neighborhood Discovery Protocol, which is available with IPv6.
NDP can be used, for example, when the network settings assigned to a device do not match the scheme used with your network, and you need to assign new settings, or you do not know the IP address of a device and it does not have a front panel that displays the IP address.
When you use NDP, changes are first made locally (using the setconfig command), and then sent to the actual device (using the commit command). This allows you to preview the changes before they are made permanent.
Note: The current version of NWare does not include all the required components to run NDP. Before you use it, you must install a program called WinPcap, which is freely available from http://www.winpcap.org/.
To use NDP to discover network devices and assign IP addresses
A Command Prompt window will be displayed.
ndpThe NDP program will start and a list of available network interfaces and commands will be displayed.
discover <interface number> where <interface number> is the number of the interface used for the control network.
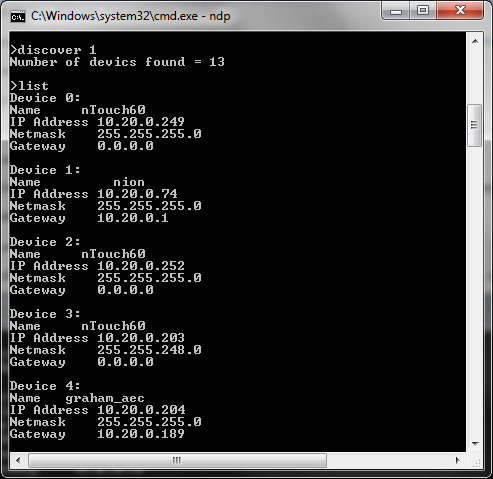
The number of discovered devices will be displayed.
listDetails of each of the devices will be shown, including the name, IP address, subnet mask and gateway.
setconfig <device number> <name> <IP address> <Netmask> <Gateway>Examples:
setconfig 3 nTouch60 10.20.0.201 255.255.248.0 0.0.0.0
setconfig 3 - - 255.255.248.0 -
Note: You must specify a device number after the setconfig command, but you do not need to specify all of the other parameters – you can specify just the subnet mask, for example. You can substitute the hyphen (-) character for the other fields to leave the settings unchanged.
commit <device number>The device will be configured to use the new settings. You may not be able to contact the device using a browser, for example, for a few seconds after the commit command has been specified.