Using the Windows interface

In this section

Specifying the basic network settings

Specifying settings for running Kiosk

Starting Kiosk manually

Changing the display resolution

Specifying advanced system configuration settings

Making a new time zone available for selection

Configuring the RAID storage system

Displaying the nControl status window

Displaying the Command Prompt window

See also

Introduction

Using the web interface

Specifying the basic network settings

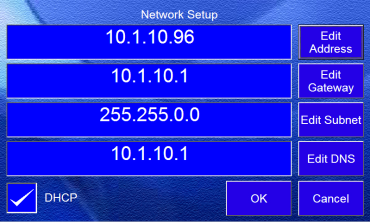
The nControl unit is configured to connect to a DHCP server to obtain an IP address and network settings. If it cannot find a DHCP server, an IP address starting with 169 will be used. The current network settings are displayed at the top of the main set up screen.

If you want to use DHCP, you do not need to change the network set up, but it is important that you check that the network to which you are connecting the unit has a DHCP server.

Note: If DHCP mode is selected, but there is no DHCP server on the network, the unit will be unable to communicate with other devices.

To specify the basic network settings

  1. On the main set up screen, click Network Setup.

  2. Clear the DHCP check box.
  3. Click Edit Address, and then type an IP address in the address box.

    Note: The IP address must be unique on the network to avoid conflicts.

  4. If your subnet is connected to a router, specify the router's IP address in the Gateway box. If you have no router, leave the Gateway box blank.
  5. Type the network mask in the Subnet box.
  6. If you intend to use a domain name to identify the nControl on the network, e.g. nControl‑mainroom.mediamatrix.corpname.net, type the IP address of a DNS in the DNS box.
  7. Click OK.

    Note: When you exit the Network Setup screen, you will be prompted to restart the system. This must be done in order for the settings to take effect.

  8. Click Yes to restart the system.

    The nControl will reboot and the new network settings will take effect.