![]()
![]()
|
|
|
When you want to run your project on a device, such as a NioNode or nControl node, you need to deploy it.
Tips:
When a project is deployed, the following tasks are performed:
The pointer will change to a ![]() , NWare will switch to gesture mode, and you will be able to gesture controls.
, NWare will switch to gesture mode, and you will be able to gesture controls.
The design check generates a report in the output frame which displays results indicating hardware usage and any problems encountered in the design.
This phase requires that the NWare PC be networked with the target set of nodes onto which a project is to be installed. During deployment, attached nodes are discovered and displayed to the designer. The designer then assigns the roles that exist within the project to the nodes. Role assignment results in each node downloading, and storing locally, the configuration data that it needs to fulfill its role during runtime.
Once a project has been deployed, the set of nodes targeted by the project perform the signal and control processing contained in the design. One or more PCs running NWare or Kiosk can connect to the target nodes to control and monitor them. Third-party control systems can connect as well.
Tips:
To deploy a project
The project will be compiled and a compilation report will be produced. For more information, see Understanding the compilation report.
The Role Deployment dialog box is displayed.
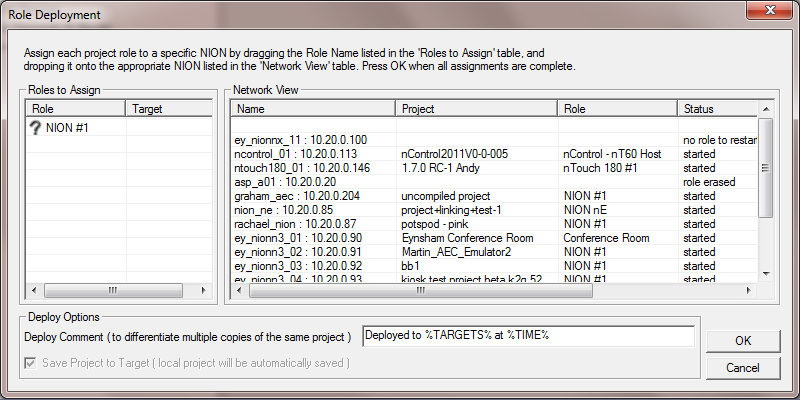
The Roles to Assign list shows the roles you have created by adding nodes to your design (and naming them uniquely).
The Network View list shows the nodes that NWare has found on the network.
Tip: If you have deployed a role to a device recently, NWare will prompt you to deploy it to the same device, and will do this automatically after a few seconds. This feature can be switched off on the Advanced tab of the User Preferences dialog box, by clearing the Enable Autodeploy countdown check box.
A green tick ![]() will be shown next to each role to show it has been assigned successfully.
will be shown next to each role to show it has been assigned successfully.
The project list is displayed when you start Kiosk. For more information, see Starting Kiosk and selecting a project.
The Save Project to Target check box is automatically selected for new projects. This will save the project file (.npa) to the target device, enabling you to upload it after deployment and make changes. For more information, see Uploading a project to NWare and connecting to it. If you load a project created in an older version of NWare, the check box will be selected or cleared according to its state when the project was last saved.