![]()
![]()
|
|
|
In order to contact a physical nWall device from an NWare nWall device, the physical device must first be assigned an IP address. This is done using CobraNet Discovery. For more information, see Assigning bundle numbers and an IP address in the nWall Hardware Manual.
To make audio data available to other CobraNet devices on the network, or to receive audio from other network devices, the nWall must be assigned a bundle number. This can be done using CobraNet Discovery, or, once NWare is connected to the nWall, from the NWare nWall device control surface.
For an nWall 0.2, the bundle will contain two output channels:
|
For an nWall 1.1, two bundle numbers are used. When the device is transmitting audio onto the network, the two channels inside the transmitter bundle contain two separate audio streams:
When the device is receiving audio from the network, the two channels of audio inside the receiver bundle are used as follows:
|
For an nWall 2.0, the bundle will contain two input channels:
|
|
See also Setting up the nControl or nTouch 180 |
In order to monitor and configure an nWall from NWare, you will need an nControl or nTouch 180 connected to both the control network and the CobraNet network. The example below shows the required setup for an nControl.
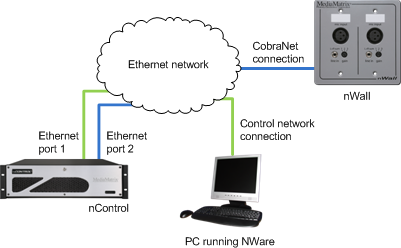
Before you start using NWare to connect to the nWall, it is important to check that the network settings for the connection to the CobraNet network are correct. In the procedure below, it is assumed that Local Area Connection 1 is connected to the control network and Local Area Connection 2 will be used for the CobraNet network. For information on the nControl network ports, see Rear network ports in the nControl Hardware Manual.
To set up the nControl or nTouch 180
If no DHCP server is available, you will need to use a static IP address.
You will be asked to log on.