|
|
Channels
|
Field name
|
Meaning
|
Amp
|
The amplifier number in the stack.
|
ID
|
The two octets of the amplifier ID number in hex format. This is shown on the display at the back of the unit.
|
IP Address
|
The IP address of the amplifier. This is shown on the display at the back of the unit.
|
Link
|
Lit (green) when a link is established between NWare and the amplifier across the network.
|
Fault
|
Lit (red) when a fault condition, e.g. thermal or short circuit, has been detected by the amplifier.
Please refer to the amplifier documentation for information on fault conditions.
|
Rmte (Remote)
|
Lit (green) when the amplifier is running in remote mode.
|
Power
|
Lit (green) when the amplifier is switched on.
If remote mode is selected on the amplifier, you can switch it on or off using the Power button within NWare.
|
Chan
|
Channel letter or number.
|
Channel Name
|
A name for the channel. This label can be used to improve the clarity of the user interface for the end user.
|
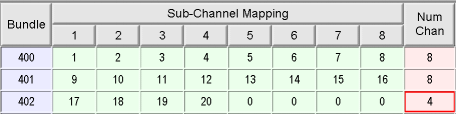
Cobranet Sub Channel
|
The subchannel numbers for the audio channels.
|
Input Level (Ci amps only)
|
Input level in dBu.
|
Gain
|
Adjusts the amount of amplification or attenuation to be applied to the channel. Range is -97 to 0 dB.
|
Mute
|
Mutes the channel output. The LED is lit (red) when the channel is muted.
|
Output Level (Ci amps only)
|
Full scale output level in dBu.
Zero dB on the meter is reached at full amp power (assuming an 8 Ohm load). When in 70V mode, full power is reached at about 5dB on the output meter.
|
Temp
|
Channel heat sink temperature.
|
Ther
|
Lit (red) when a channel’s heat sink temperature reaches 75°C (which may indicate an obstructed air supply). The channel will independently protect itself by disconnecting its load and shutting down until it has cooled.
|
DC
|
Lit (red) when the amplifier channel detects DC voltage or subsonic frequencies at a channel output. The respective output relay will immediately open to prevent loudspeaker damage.
|
RTLM
(Real Time Load Monitoring)
|
Lit (red) when the load for the channel exceeds the upper or lower limit. If this indicator is lit, and the RTLM training process has successfully completed, it indicates that the load on the amplifier has altered significantly. This could be because a loud speaker has blown, for example.
|
User Temp
|
The user-specified upper limit for the channels' heat sink temperature. If the limit is exceeded, the light will be lit (yellow).
|
IGM Alert
|
Lit (yellow) when the Instantaneous Gain Modulation (IGM) circuit detects a load that overstresses the output stage. The channel gain is automatically adjusted to a safe level.
|
ACL Alert
|
Lit (yellow) when the Active Clip Limiting (ACL) circuit is active because a channel has reached the clipping point.
|
|
|
|
RTLM (CKi amp)
|
Field name
|
Meaning
|
Amp
|
The amplifier number in the stack.
|
ID
|
The two octets of the amplifier ID number in hex format. This is shown on the display at the back of the unit.
|
IP Address
|
The IP address of the amplifier. This is shown on the display at the back of the unit.
|
Link
|
Lit (green) when a link is established between NWare and the amplifier across the network.
|
Fault
|
Lit (red) when a fault condition, e.g. thermal or short circuit, has been detected by the amplifier.
Please refer to the amplifier documentation for information on fault conditions.
|
Rmte (Remote)
|
Lit (green) when the amplifier is running in remote mode.
|
Power
|
Lit (green) when the amplifier is switched on.
If remote mode is selected on the amplifier, you can switch it on or off using the Power button within NWare.
|
Chan
|
Channel letter or number.
|
Upper
|
The upper limit for the load level. If the limit is exceeded, the Fault light will be lit.
|
Lower
|
The lower limit for the load level. If the limit is exceeded, the Fault light will be lit.
|
Train
|
Starts the training process. Used once speakers have been connected to the outputs and audio is running through the amplifier. The process takes between 5 and 10 minutes. The Training light will switch off automatically when the process is complete.
Note: If the load level is too low, the training process will not complete.
|
Abort
|
Aborts the training process. Use this button to stop the training process if more than 10 minutes have elapsed since the process was started, and the Training light is still lit.
|
Training
|
Lit (green) when Training is in progress.
|
RTLM (Ci amp)
|
Field name
|
Meaning
|
Amp
|
The amplifier number in the stack.
|
ID
|
The two octets of the amplifier ID number in hex format. This is shown on the display at the back of the unit.
|
IP Address
|
The IP address of the amplifier. This is shown on the display at the back of the unit.
|
Link
|
Lit (green) when a link is established between NWare and the amplifier across the network.
|
Fault
|
Lit (red) when a fault condition, e.g. thermal or short circuit, has been detected by the amplifier.
Please refer to the amplifier documentation for information on fault conditions.
|
Rmte (Remote)
|
Lit (green) when the amplifier is running in remote mode.
|
Power
|
Lit (green) when the amplifier is switched on.
If remote mode is selected on the amplifier, you can switch it on or off using the Power button within NWare.
|
Chan
|
Channel letter or number.
|
Enable
|
Switches RTLM reporting on. Enables collection of RTLM data points.
|
Disable
|
Switches RTLM reporting off. Stops the training process, keeping previous training data intact.
|
Norm Load
|
Impedance of the channel normalized to 100 ohms.
|
Char Load
|
Full spectrum load impedance.
The value can change (along the impedance curve) according to the dominant frequency content of the program material. However, if you feed a sine wave into the amplifier, a more accurate impedance can be measured (at that frequency and level).
|
Enabled
|
Lit (green) when RTLM reporting is enabled.
|
Active
|
Lit (green) when training is in progress and the load on the channel is actively being checked.
|
Below Threshold
|
Lit (green) when the channel voltage is below the minimum threshold required to measure load data.
|
Progress
|
Indicates the percentage completion of load data collection during training and after a reboot.
|
Upper
|
The upper limit for the load level. If the limit is exceeded, the Fault light will be lit.
|
Lower
|
The lower limit for the load level. If the limit is exceeded, the Fault light will be lit.
|
Train
|
Starts the training process. Used once speakers have been connected to the outputs and audio is running through the amplifier. The process takes between 5 and 10 minutes. The Training light will switch off automatically when the process is complete.
Note: If the load level is too low, the training process will not complete.
|
Abort
|
Aborts the training process. Use this button to stop the training process if more than 10 minutes have elapsed since the process was started, and the Training light is still lit.
|
Training
|
Lit (green) when Training is in progress.
|
Advanced
|
Field name
|
Meaning
|
Amp
|
The amplifier number in the stack.
|
ID
|
The two octets of the amplifier ID number in hex format. This is shown on the display at the back of the unit.
|
IP Address
|
The IP address of the amplifier. This is shown on the display at the back of the unit.
|
Link
|
Lit (green) when a link is established between NWare and the amplifier across the network.
|
Fault
|
Lit (red) when a fault condition, e.g. thermal or short circuit, has been detected by the amplifier.
Please refer to the amplifier documentation for information on fault conditions.
|
Rmte (Remote)
|
Lit (green) when the amplifier is running in remote mode.
|
Power
|
Lit (green) when the amplifier is switched on.
If remote mode is selected on the amplifier, you can switch it on or off using the Power button within NWare.
|
Subnet
|
The subnet mask for the Ethernet / CobraNet network.
|
Gateway
|
The IP address of the router.
If there is no router, this will be set to 0.0.0.0.
|
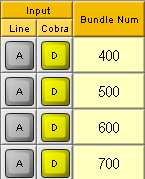
Input (Line / Cobra)
|
Selects either analog audio input using Phoenix connectors or digital audio input from the CobraNet network.
|
Bundle Num.
|
The audio bundle number for the device. This must correspond with the bundle number specified for the NION associated with the amplifier. You can then make connections to the amplifier using the NION flyoffs.
|
Gain/Sensitivity
(CKi amps only)
|
Position of the Gain switch at the rear of the amplifier.
This can be set to give constant sensitivity, or a constant gain of x20 (26 dB) or x40 (32 dB).
Display only.
|
Volt
|
Voltage provided to the amplifier.
Display only.
|
Amp
|
Current provided to the amplifier.
Display only.
|
Watt
|
Input power provided to the amplifier.
Display only.
|
Version
|
Firmware version running on the amplifier.
Display only.
|
 Here is a summary of the available fields for each individual amplifier.