- Switch on the power.
- At the rear of the unit, press the set up button.
The Maintenance menu is displayed on the screen.
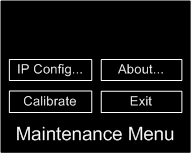
- Press IP Config.
The IP Configuration menu is displayed on the screen.
Tip: If you find that the screen is not responding when you press it, it may need calibrating. For more information, see Calibrating the screen.
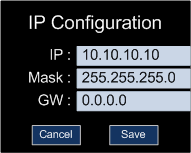
- Press the IP address next to IP.
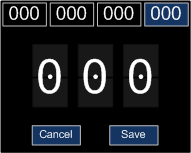
The IP address is displayed at the top of the screen. This screen allows you to specify the IP address segment-by-segment. The segment being configured is highlighted in blue at the top of the screen.
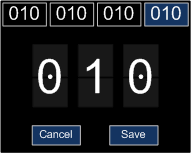
- Press one of the four boxes at the top the screen to select the segment you want to edit.
- Press the top half or bottom half of one of the three numbers in the middle of the screen to change the value.
Pressing the top half of a number increases the value. Pressing the bottom half decreases the value.
- Repeat steps 5 and 6 to change the other segments as necessary.
- Press Save.
- Press the subnet mask next to Mask.
The subnet mask is displayed at the top of the screen. This screen allows you to specify the subnet mask segment-by-segment. The segment being configured is highlighted in blue at the top of the screen.
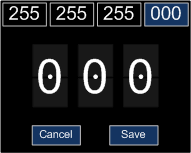
- Press one of the four boxes at the top the screen to select the segment you want to edit.
- Press the top half or bottom half of one of the three numbers in the middle of the screen to change the value.
- Pressing the top half of a number increases the value. Pressing the bottom half decreases the value.
- Repeat steps 10-12 to change the other segments as necessary.
- Press Save.
- Press the gateway next to GW.
- The gateway is displayed at the top of the screen. This screen allows you to specify the gateway segment-by-segment. The segment being configured is highlighted in blue at the top of the screen.
- Press one of the four boxes at the top the screen to select the segment you want to edit.
- Press the top half or bottom half of one of the three numbers in the middle of the screen to change the value.
- Pressing the top half of a number increases the value. Pressing the bottom half decreases the value.
- Repeat steps 17-19 to change the other segments as necessary.
- Press Save.