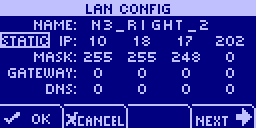
Using a static IP address

  1. From the main menu, select CONFIG to display the first configuration page, LAN CONFIG.

  2. Move the cursor to the second line, next to IP.
  3. Push the wheel button, then move the wheel until the cursor position indicates STATIC IP, then push the wheel button again to confirm the settings.
  4. Use the wheel and wheel button to specify an IP address.

    Note: The IP address must be unique on the network to avoid conflicts.

  5. Set MASK to the network mask for your network.
  6. If your subnet is connected to a router and this NioNode will be connecting to devices across the router, set GATEWAY to the router's IP address.

    If you have no router, set GATEWAY to 0.0.0.0.

    Tip: The DNS field is used for contacting a DNS on the network, which in turn is used to resolve domain names of time servers. For more information, see Setting the time and date.

  7. Select NEXT to advance to the next page, or OK to confirm the settings and exit.

    To abort the process, select CANCEL.

See also

DHCP versus static IP

Using DHCP to assign an IP address automatically