![]()
![]()
|
|
|
It is very important that you read the installation procedure carefully before you attempt to install an nControl unit.
Note: Do not turn the unit on until instructed to do so in the procedure below.
To install an nControl unit into an equipment rack
If any of these items is missing, please contact your Authorized Peavey MediaMatrix contractor/dealer.
If you intend to use NWare:Kiosk with the nControl unit, or you want to view status information and change advanced Windows settings, you will also need a monitor, keyboard and mouse.
Note: It is very important that you do not misplace the USB sticks. Ensure the green hardware key remains inserted in the nControl unit and the red restore USB stick can be found easily should you need to recover the unit.
The unit does not require a gap above and below it in the equipment rack, as there are no ventilation holes at the top or bottom – all airflow is from the front of the unit to the back.
|
Use caution when lifting the unit. Two people are required to install it into an equipment rack. |
|
It is important to keep the rack stable. If this unit is the only one in the rack, install it at the bottom. If there are several devices to install in the rack, load the rack from the bottom up. |
|
|
Do not block or obstruct the fan vents. Airflow must be maintained. |
|
Caution: The unit may appear to be fixed securely using a single screw on either side, but we recommend that you fix the unit using all four screws.
The nControl unit is configured to connect to a DHCP server to obtain an IP address and network settings. If it cannot find a DHCP server, an IP address starting with 169 will be used.
You can use any of the available Ethernet ports. If the nControl is fitted with an Ethernet expansion card, you can use the ports on this card as well as the two ports fitted to the motherboard.
Notes:
Be sure to note the port name: COM1 (above the VGA port), COM2, COM3 or COM4 for when you configure the nControl using NWare.
For information on the pin-outs, see RS-232 serial port pin outs.
Each card shipped from Peavey has an adapter number of 1, which is set using a jumper on the card. If you want to fit more than one AudioScience card to an nControl, you must specify a unique adapter number for each card.
For more information on setting the jumpers, see Installing multiple AudioScience cards.
Also refer to the documentation supplied with the card for more information on installation and connections.
|
Use only the supplied cables or an equivalent international version. |
Note: You must connect both cables to the unit, otherwise a warning sound will be heard when you switch the unit on. The system is designed to provide redundant power using two independent power supplies.
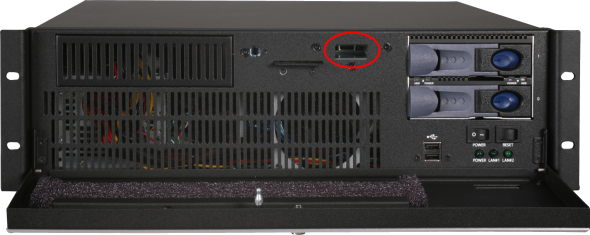
Caution: The USB port for the hardware key is recessed, so that when the front panel is closed, the hardware key does not get damaged. The other USB ports on the front panel are not recessed and must not be used, otherwise you risk damaging the hardware key or the port.
Notes:
If a monitor is connected, a MediaMatrix boot screen will be displayed during the boot process. When the nControl unit has booted, the main set up screen will be displayed.
If the unit fails to power up, check that both power cables have been inserted correctly and that power is being provided by the power source.
|
See also |