- In the device tree, expand the Hardware folder.
- Expand the XControl folder.
- Expand the LCD folder.
- If you want to wire the xControl LCD device to control devices in your design, drag a Generic Controls (PASHA) device over to the design page.
If you want to wire the xControl LCD device to audio devices in your design, drag a Zone Source and (PASHA) device over to the design page.
The X-Control Properties dialog box is displayed.
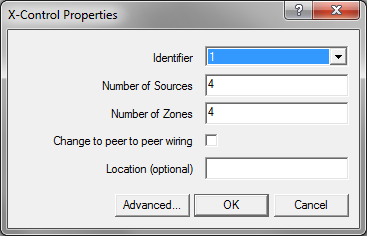
- In the Identifier list, click the base code for the xControl LCD you want to control.
The base code is selected on the Set Base Code screen of the xControl LCD. For more information, see Setting the unit base code in the xControl LCD Hardware Manual.
- In the Number of Sources box, type the number of inputs to use as program sources. An input wiring node will be added for each one.
Note: Currently, the xControl LCD can control a maximum of four sources.
- In the Number of Zones box, type the number of zones that the xControl LCD will manage. These could be individual rooms in a building, for example.
Note: Currently, the xControl LCD can control a maximum of four zones.
- If you are using a Generic Controls (PASHA) device, and you want the output wiring nodes to use peer-to-peer wiring, as opposed to master-slave wiring (the default), select the Change to peer to peer wiring check box.
Note: The Change to peer to peer wiring check box is only available on the Generic Controls (PASHA) device.
- If you want to display the physical location of the device on the device block, type the location details in the Location box.
- If you want to change the role to which this device belongs:
- Click Advanced.
The Advanced properties dialog box is displayed.
- Click the
 button to change it to the
  button, and then select a role name in the list.
- Click OK.
- Click OK.