![]()
![]()
|
|
|
There are several ways to mount the device:
Read the remainder of this section and then refer to the instructions provided with your mounting device in order to complete the installation procedure.
The unit uses a standard 75mm VESA mount. Ensure that you use an appropriate bracket and appropriate screws for this type and size of mount.
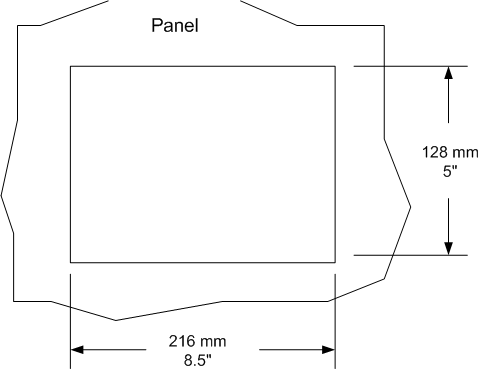
If you are mounting the unit into a cavity, such as a panel, you will need to make a cut out as shown in the diagram below.
Note: It important to use appropriate mounting hardware. For example, when attaching to a drywall, use screws with wall fixings, rather than nails.
The nTouch 180 requires 12VDC power. Each unit is shipped with a power supply capable of 12VDC at 3A max (36W max). You can choose to power the nTouch 180 locally by placing this power supply near to it, or you can power the unit remotely with an industrial 12VDC power supply.
|
When connecting an external power supply, note that the plug is wired with the ground on the sleeve of the barrel and the +12VDC connected to the center pin. The warranty does not cover issues caused by power supply polarity reversal. |
|
We recommend that two people complete the installation, to ensure that the unit does not get damaged, particularly when it is mounted in a position where it may fall. |
|
Do not block any of the ventilation openings. |
Note: Do not turn the unit on until instructed to do so later in this manual.
|
See also |